Learning how to fix sagging patio chairs is almost an essential skill if you have outdoor furniture, whether it’s under a gazebo or left fully exposed to the elements. After all, constantly being exposed to weather elements means the furniture gets damaged easier and quicker than their indoor counterparts. Also, if you catch and repair the damage early enough, you can keep your patio chairs for longer.
Nevertheless, this is likely the first time you’ve noticed the signs of wear and tear. As such, it’s understandable that you may not have the know-how to fix it. However, you can pick up the right procedures in the write-up below, depending on the type of patio chair in your home.
If your patio chairs have cushions, they will likely be the first components to deteriorate. After all, these have to bear your weight day in day out. This is also the case with your indoor couch.
The sagging happens because the materials inside the cushions have deteriorated over time, and it can be one of the easiest things to fix. First, you’ll have to remove the material inside the cushion cover, and in most instances, it will be foam.
Your approach will depend on how the manufacturer designed the cushion covers. Some are zipped, while others are completely sealed by sewing. The former is an easier option to deal with since you unzip the cushion cover and easily pull out the insert.
As for the latter, you’ll take out the stitches on one end of the cushion case and pull out the insert as well. You’ll also need to buy foam and have it on standby while you’re taking out the inserts. After that, you can take measurements of the inserts and cut similarly-sized pieces from the new foam. A spray adhesive should be useful in attaching the old insert with the new one.
Next, you stuff the now firmer insert back into the cushion cover. Alternatively, you can forego the old insert if you remember the size of your cushions before they got saggy. In this scenario, you can just buy and cut matching foam and use it to replace the old insert.
Re-zipping or re-sewing the cushion cover is the last step in sagging cushion restoration before placing it back on the patio chair. This is one of the more straightforward approaches, although there are other ways to go about it. Of course, this is dependent on the extent of damage and the underlying issues.
In some cases, the frame under the cushion is the problem. For this, you can reinforce it using fitted plywood. Take the measurements of the seat and either cut the plywood yourself or get a professional’s help. Nevertheless, once you place it under your cushions, it should serve to prop them up some more.
Alternatively, buy and fit sagging chair supports under your saggy cushions and be done with the restoration within minutes. Users recommend the Furniture Fix six-set sagging chair support as it features a customizable fit and is easy to assemble thanks to the interlocking panels.
If your cushions are made of springs, adding more of them or replacing a few of the old ones should fix the problem. For this, you’ll likely need a professional’s help, and that can be costly. That said, those confident in their DIY capabilities can give it a try. Finally, stuffing Polyester fiberfill into the cushion cover is another viable solution, and depending on the amount you use, the cushions may firm up.
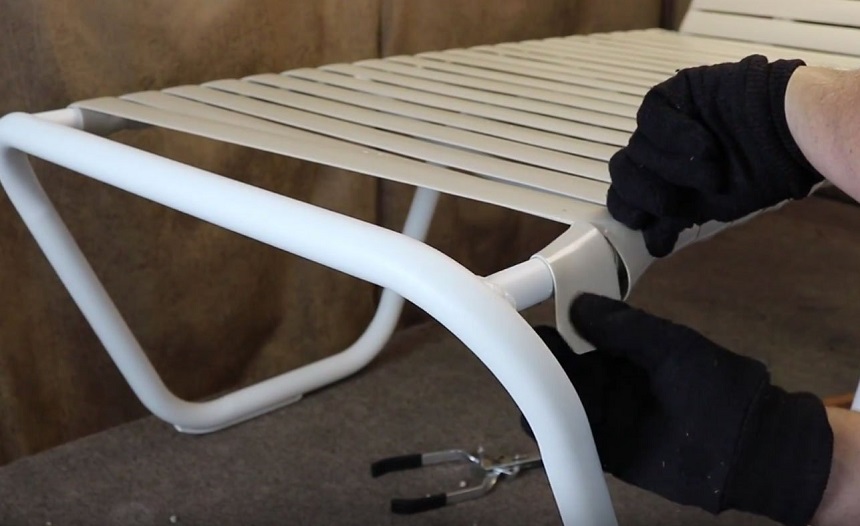
Except for the repetition required when repairing a vinyl chair, everything else is fairly easy. As such, you can do it yourself quite easily if you have the right equipment and accessories. First, you’ll need to get new vinyl straps. They are available on Amazon, and according to most reviewers, the LIUDA 2″ x20′ is an excellent replacement option for old, saggy vinyl straps. It is also extruded for outdoor use hence is perfect for fixing sagging patio chairs.
Next, you’ll need to remove the older straps. Cut each strap in the middle and then unwrap the frame on each end. Finally, you’ll have to remove the pegs inserted in the holes on the frame to free the old strap completely.
Measure the distance from one end of the frame to the other. However, we recommend wrapping the tape measure around both ends of the chair at least once. Start your measurement at the peg hole and account for the peg hole on the other end of the frame as well. This should inform how you cut your strap. That said, it’s always better to start by cutting a single piece and then putting it on the chair to see if it fits. After that, you can cut all the strips you need for the rest of the refurbishing process.
Punch holes on the ends of these straps, making sure you leave a bit of distance to the edge. This will keep the strap from tearing under your weight. Also, soaking vinyl straps in hot water should loosen them up, which is necessary for the fitting process. After that, put the peg through the strap and then attach it to a hole on the frame. It should be the same hole that you removed the previous peg from as you were taking out the old strap.
In most cases, this will be the whole on the inside of the frame. Wrap the strap around the metal going through the bottom and up over the frame. Next, pull it to the other end of the chair. Once you get there, wrap the strap around the metal but be careful to avoid the hole. You can stretch the strap a bit to make this work.
The end of the strap should end up on the inside of the frame. Once you’ve done this, pull the free end of the strap to the hole and then attach it using a peg. The strap is now fastened but misaligned. Pull the wrapped part over the hole and peg to make sure it is covered and that the strap is well aligned. After that, repeat this for all the other straps you’ve taken out of the patio chair.
The elasticity brought about by the hot water will be gone as soon as the straps are dry. After that, you’ll no longer need to deal with a sagging chair.
Next, we tell you how to fix a mesh-sling patio chair. Although some of their designs may vary slightly, the process for fixing them is almost always the same. Notably, mesh-sling patio chairs consist of just two main components: the frame and the mesh sling. As such, the only reason for it to sag is if the mesh sling is old and has seen its fair share of wear and tear.
You can ditch the old mesh sling, replace it with a new one, and your problem will be as good as solved. For this, start by taking chair measurements before you even set a date for the repair project. This is because you need a new mesh sling, and if you order from Amazon, it should take a few days to arrive at your doorstep.
Measure both the width and the length. For the former, start at the rail center on one end of the chair and stretch the tape measure to the other rail center. Also, note that some options don’t feature equal width at the top and the bottom of the chair. Consequently, measuring the width independently for both these sections is highly encouraged.
Lengthwise, start at either the top or bottom of the mesh sling and measure to the opposite end. Be sure to account for the curvature of the chair while doing this; otherwise, you’ll order a smaller mesh sling than you need. A pro tip is that you should always order slightly larger mesh slings, so you have extra material to work with.
If user and expert reviews are to be believed, the SL003 Beige Woven Sling is excellent for outdoor sling chairs. It is fade, water, and UV resistant, and consequently, leaving it in the elements shouldn’t be a big deal.
On the D-day, start by separating the sling rails from the rest of the chair, as it’ll make your work easier. For this, you may need to unfasten some screws. Next, follow up by cutting the old mesh-sling from top to bottom. The tension bars will also easily come off at this point.
After that, locate the caps on the ends of the sling rails and remove them. This should allow you to pull the spline and the attached mesh sling out of the rail. If this is too difficult to do with your hands, get a pair of pliers as it’ll make your work easier. After that, a new paint job may be required as part of the chair’s restoration.
Next cut up the new sling into the correct measurements. That said, you might want to leave an extra inch in length and two additional inches in width. This allows you to fold back the material half an inch on the top and bottom before sewing so it can have a neater outlook.
As for the width, you’ll need to fold the edges on the sides of the material back an inch before sewing. The channel created is where you will fit the spline. The Awning Cord Chair spline option has been recommended by previous users as an excellent spline replacement for this part of the process since it is both durable and flexible. Slide the spline and new sling mesh through the channels on both rails.
Remember to replace the rail caps after you’re done. You can then start screwing the rails back onto the rest of the chair frame. This will increase the tension between the rails, and you can then re-instate the tension bars. To make sure these bars go back to being straight, you might have to use a rubber mallet to beat them into shape. Tighten the screws again, and the chair should be good enough to sit on again.
Zero gravity recliners are also popular purchases that end up on the patio, and just like the other chair types we mentioned above, they may start to sag after long periods of use. They might look a bit similar to mesh sling chairs but are different in how they’re made.
For one, they recline and are therefore better options for relaxations. Next, they use a fabric sitting surface that doesn’t stretch.
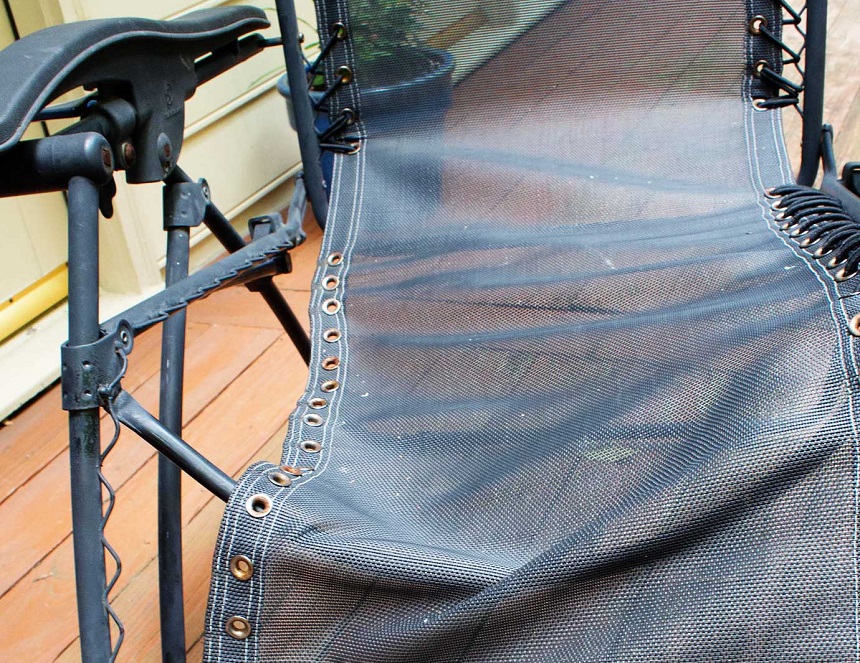
If you’re wondering how they end up sagiing, the answer is that they are attached to the frame of the seat using elastic cords. It is these cords that will deteriorate over time and eventually lead to sagging. This, of course, makes your course of action clear if you want to correct the problem.
Start by buying a replacement cord. Remember that the cord should be elastic and of the highest quality if you want the fix to last longer. The UNEEDE replacement cords are a popular and reliable option if we were to go by the opinions of both users and some zero gravity recliner experts. They last long, are easy to use, and come with instructions on how to add them to your chair.
Once the purchase arrives, you can go to your patio and take out the elastic cords holding your chair together. If you have no more use for them, you can use scissors to cut the ends and make the whole removal process easier.
After that, knot the new cord on the first buckle and ensure it’s tight enough to hold. Follow up by threading the cord through the first eyelet on the fabric of the seat and back to the second buckle. Keep doing this for as long as there are buckles and eyelets, all while maintaining the cord’s tightness. Remember that if you let up even a little, the chair may end up sagging again.
When you reach the last eyelet, wrap the cord a second time on the last buckle, then squeeze the remaining cord through the last eyelet a second time as well. Alternatively, you can use other means to ensure the elastic cord doesn’t come unraveled. This should firm up the chair.
If your wicker patio chair Trusted Source Wicker - Wikipedia Wicker is a technique for making products woven from any one of a variety of pliable plant materials, a generic name for the materials used in such manufacture, and a term for the items so produced. en.wikipedia.org is sagging, it’s probably because some of the wicker strands are worn out and are breaking. Consequently, you can correct the issue by removing the bad strands and replacing them with new ones, which isn’t hard to do.
Buy wicker material and strands similar in color to those on your chair to avoid inconsistencies. If the ones you have on your chair are made of rattan, purchase something similar. If they are made of resin, buy something similar as well.
According to reviewers, the Laphivieh Wicker Repair Kit is an excellent option to keep around especially if you have wicker patio chairs made of similar rattan material. Once you’re done with the repair, you can use the leftover material to DIY some original crafts as well.
Soak the new strands in water for at least half an hour while you remove the broken ones. They are woven together but pulling on the damaged ones should help free them. Be sure you’re pulling on the right ones as the undamaged strands won’t budge.
Once you get to the end of the chair, you can cut off the peeled strands. Use scissors or a utility knife for this and make sure you get a nice clean cut where nothing is left sticking out. Take one of the new strands from the water and cut it to size. It should be just slightly longer than the one you cut off.
Weave the new strand into the chair while ensuring you go over and under the remaining strands. There should be no difference in appearance and weaving technique between the new and old strands. At the ends of the chair, you can glue the new wicker material to the stump of the previous strand. Be sure to cut off any excesses before you do this.
If you do this for all of the broken strands, you should find the chair to be firmer and more stable than it was before.
Outdoor patio furniture is expensive and may be a chore to buy. You may spend all your time comparing the available options, and you may still end up thinking the new one is not as comfortable as the last one. Also, the new one will likely start to sag over time, and you can be drawn into an endless loop of throwing out damaged patio furniture and getting new installations.
It’s more cost-effective to learn how to fix sagging patio chairs. Notably, it’s not an expensive process, especially if you do it yourself and the materials needed are easily available. As for the know-how, you can pick up that knowledge from the sections above. We covered wicker chairs, cushions, vinyl chairs, and zero gravity options as well. As such, there’s no excuse for you not to do it.